Instructions for Configuring SVL from Stone Johnson for the Teleputas AFK Takeout
Hi, this is Zackanory, accomplished porn director and owner of the Zackanory Island sim. I've got my tech head on today so I hope you have too! These instructions take you through the steps to running the SVL system from Stone Johnson (SVL stands for Smart Vendor for Livebots), in a Firestorm viewer on the Windows operating system. If you are using a different operating system you might want to talk to me in world before following the steps described here. SVL leverages RLV (Restrained Love Viewer), an API within Second Life with a long and interesting history. The abbreviations are similar and will be used from now on so it's worth taking a moment to differentiate the two things. The instructions are quite lengthy so please feel free to contact me in world if you get stuck at any point.
1) Get the SVL system by touching the Livebot vendor in my office. This is a free version of the system that is available exclusively for girls who are going to work in Teleputas (it is configured to only initiate rentals on Zackanory Island). Alternatively get the full version of the product here.
2) The following step relates to buying and configuring an appropriate Open Collar to use with the SVL system. You can save time by buying a preconfigured collar from the SVL Market Place store.
Alternatively you can acquire an Open Collar from the official Open Collar sim. If you do not like this collar there are detailed notes about other collars which may be compatible in the Instructions notecard which comes with the SVL system. According to those notes "...OC7.X and the VD OC Peanut should work fine. The collar MUST use channel 1 and MUST default to using first two letters of your login name as prefix."
Do the following whichever collar you are using:
Turn off RLV, which will require relogging. This is to ensure you have full permissions to edit everything you need to.
Save the collar somewhere in your inventory other than in your #RLV folder.
Wear the collar.
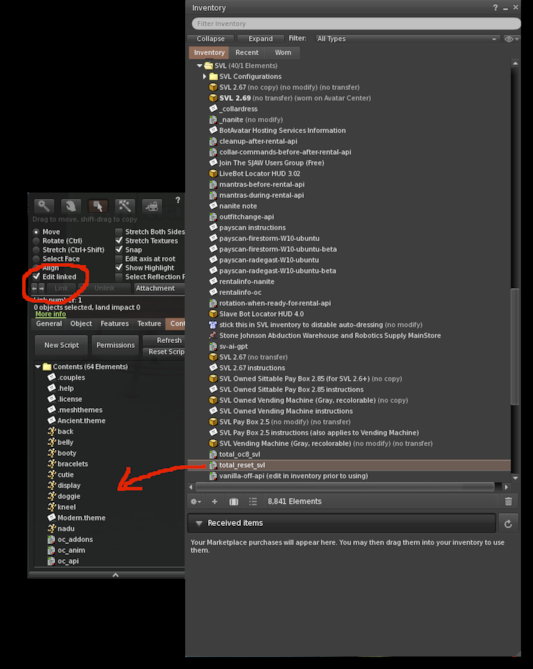
Do the following only if you are using your own collar, i.e. not the preconfigured one mentioned above. Edit the collar, select Edit Linked, go to Content tab. You need to copy the script total_reset_svl from the contents of the SVL folder in your inventory into each linked prim in the collar which contains any other script. This is the script that allows the SVL system to give control of your collar for a fixed period of time only. Without it anyone who rents you could remain your master after the rental period ended. You can go through each linked prim by using the little arrow buttons shown in the image, starting with the base prim which is always number 1.
3) Set up your #RLV folder the way you like it. If you are already very familiar with RLV you can probably skip this step and go on to point four. The basic requirement is that you make a subfolder of #RLV called .outfits (note the DOT in .outfits), and then inside this you make two more folders Default and .Naked (note the DOT in .Naked). The capitalization is important, as SVL is case-sensitive (even if your collar isn't). Those two directories should have *links* to all the stuff you want as your default and naked states. The default state is the state of dress that SVL will return you to when each rental ends. The easiest way to create the links is to find the item of clothing in your "Current Outfit" folder or your Outfits window, right click and choose "Find Original" or "Show Original". This will open up the folder where the item is stored, right click and copy this and then go back to where you want to create the link and choose "Paste as Link".
You also need to configure a .core folder, again in Outfits, which contains shortcuts to all the things you are wearing that you don't want anyone to remove ever, such as your mesh head, your hair, any HUD that you want to wear for AFK work such as a pregnancy HUD or whatever. Your .core folder should also include links to your collar and your SVL device. The items in your .core folder should not be included in any other folder, because the fact that they are in .core automatically includes them in every other outfit. It follows that your .Naked folder might in fact be empty. On the other hand you might include something from your default outfit that isn't part of .core but you think looks good on you naked, such as a particular pair of heels etc.
Your clients will now have two ways to strip you. On your collar menu they can go to Apps >> Outfits >> Browse and then in the next menu they can choose "Naked". Of they can go to Apps >> Detach which then gives them a menu with everything you are wearing. Unfortunately this is an over-padded list because it includes all the stuff in your .core folder, but even if they choose one of these items they won't be able to remove it. It does mean that in theory, if they can identify them, they can remove specific pieces of clothing.
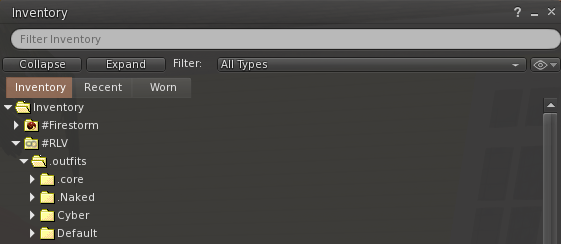
My personal knowledge of RLV is very slight, I have only learned the above while figuring out how to use the Self Vendor system. If you research RLV you will find out about other configurations you can do. For example you can make as many outfits as you want in the .outfits folder (French Maid, latex doll, lumberjack etc.).
4) Add the SVL attachment - ignore all the messages it produces in local chat (the SVL system will not be able to work anyway because you still do not have RLV activated). You will see the following rather scary looking warning:
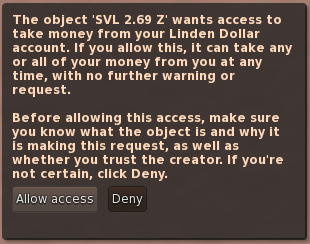
This warning appears because, in exceptional circumstances, should the rental fail, SVL needs to refund the customer with the money they have paid. For the script to have the potential to do that it needs to get this confirmation at the outset. You will have seen the same warning if you have ever set up a tip jar or anything else that sometimes needs to send lindens. If you're still not sure what this warning is for please read up on it before proceeding.
5) Edit the SVL attachment by right clicking on it in your inventory and choosing edit. Go to the contents tab and edit the notecard "config4":
Put your UUID (the long number under your name in your profile) as the second of the first three lines. Make sure that all the characters are there. The first and third lines leave all zeros (null key).
Still in config4, change the fourth line to the prefix for your collar, usually the first two letters of your name, in lower case (e.g., for Mary Smith it would be ma).
The fifth line is the rate you charge in minutes. For example if you want to charge 100 lindens per hour this would be 100/60 = 1.66666667.
The sixth line is the name of the region, Jaguar Mountains.
The seventh line is the co-ordinates of the spot you get returned to. You can choose an available spot near one of the invisible pose stands (use Ctrl+Alt+T to see where these are). The format should be e.g. <159,91,27>.
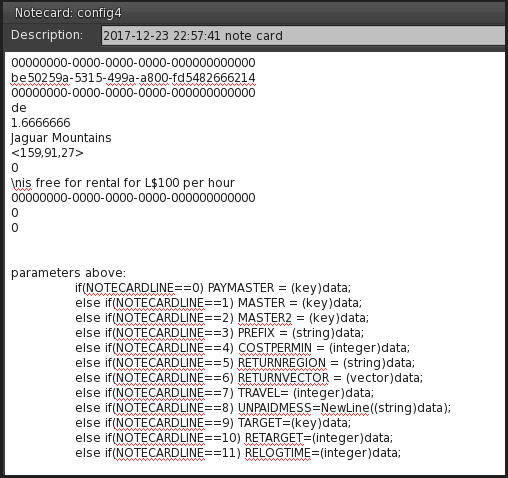
Line nine is the text that will appear over your head. It should be something like "\nis free for rental for L$100 per hour", obviously substituting with the rate you want to charge. The text always begins with your display name, and the "\n" is necessary to force the text that follows to begin on a new line.
If you study the instructions that come with the SVL system you will know that line ten is the sit target at your home position, so SVL can be configured to teleport you home and sit you on a specific piece of furniture. However, we will also be configuring the "cleanup-after-rental-api" script to sit you on one of the showers each time a rental is completed, and this would interfere with that, so we leave the configuration of line ten with its default value of 00000000-0000-0000-0000-000000000000.
6) Now you need to configure and copy in the cleanup-after-rental-api script from the SVL package. Edit the SVL attachment that you are wearing as described above, navigating to the Contents tab as before. Now copy in the cleanup-after-rental-api script. Double-click the script in the Contents tab to begin editing it. You need to add the line shown in the screenshot, which tells the script to place you on your chosen INM shower at the appropriate time. It also tells the script where to put you after showering.
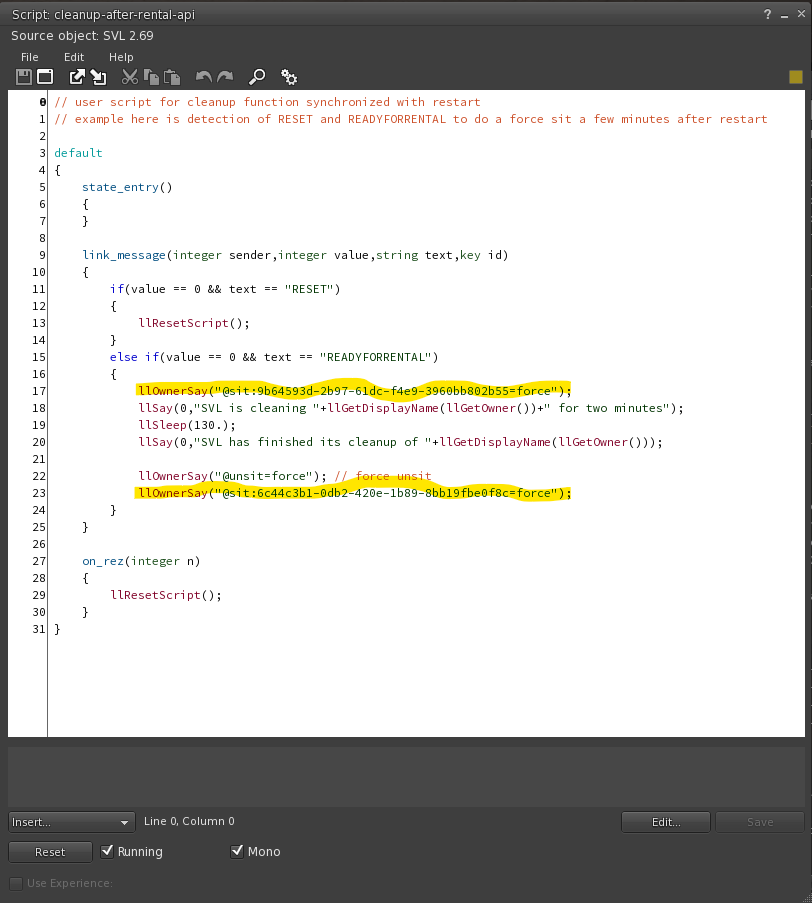
The two lines that are important are highlighted in the screenshot. The first is the shower...
The complete line should be either: llOwnerSay("@sit:c48bb781-2f5b-3f91-0872-f27f3ea5d047=force"); ...for the upstairs shower, or: llOwnerSay("@sit:9b64593d-2b97-61dc-f4e9-3960bb802b55=force"); ...for the downstairs shower.
This is followed by a similar line below, but here you should replace the UUID in the script with the UUID of the pose stand you will be posing on when between rentals: llOwnerSay("@sit:[Insert key of pose stand here]=force"); You can get the UUID by right-clicking on the pose stand (you will have to do control+alt+T to see it) then clicking the "Copy Keys" button on the first tab of the properties window.
Incidentally, the reason the brothel uses pose stands rather than relying on the girls' own animation overriders is that the SVL script can't reliably ensure that you are facing in the right direction after teleporting you.
7) Turn RLV on and relog. You are now technically in a ready state for rental, but there is still one very important problem, which is that on its own SVL cannot detect when someone has paid you. However, it needs to be able to do this in order to kick off the rental. The solution is to use an external program to detect the payment (which it does by looking for any new lines in your chat log corresponding to payments). The external program then sends a message to the RLV script that is running inside Second Life and the rental can begin. The steps to install, configure and run the external program are as follows:
8) First you need to configure Firestorm to save local chat to an external file. To do this enable the "Save nearby chat logs" option in Preferences >> Privacy >> Logs & Transcripts. Then you need to send information about payments to the log we just mentioned in Preferences >> Notifications >> World and then check "Notify me when I spend or get L$", and then underneath that "Report L$ transactions in nearby chat instead of toasts".
9) Download the Payscanner program from zackanory.com. This is a program I wrote to facilitate using the SVL system. I understand there are trust issues associated with running programs from unknown sources, so you are also welcome to download and inspect the source code here, if you wish to do so and have Visual Studio installed. This program is compiled to run on the .NET compact framework and as such it is theoretically ready to run on Linux or Apple OS as well as Windows, although it has only been tested on Windows. It is very likely that the program will need some tweaks before it is ready to be used on other operating systems, so if you want to install it on something other than Windows please IM me and we can look at it together. Unzip the downloaded file, the contents of which look like this:
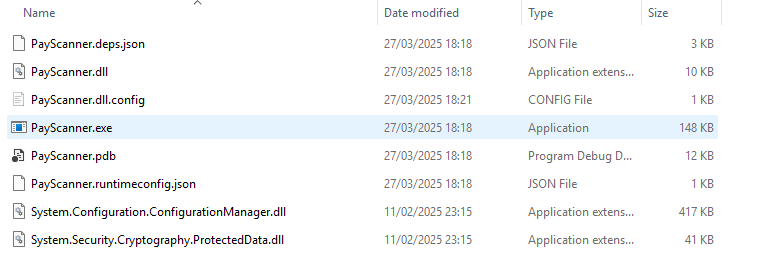
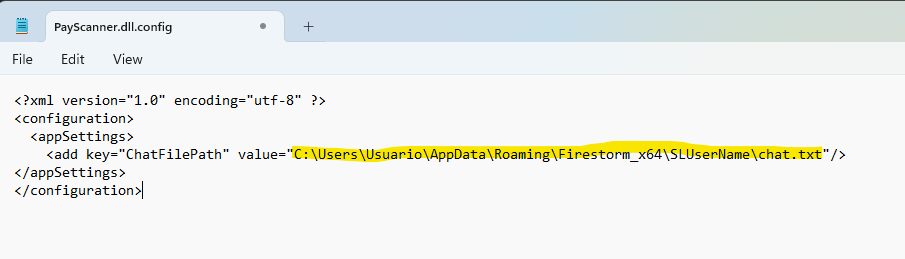
To configure the program, open the file called "PayScanner.dll.config" (set Windows Explorer to show file extensions if you can't see them) using Notepad or any similar program. You need to edit the following line so it shows the correct path to the file chat.txt:
Double click PayScanner.exe to launch the program. When it is running it will look something like this:
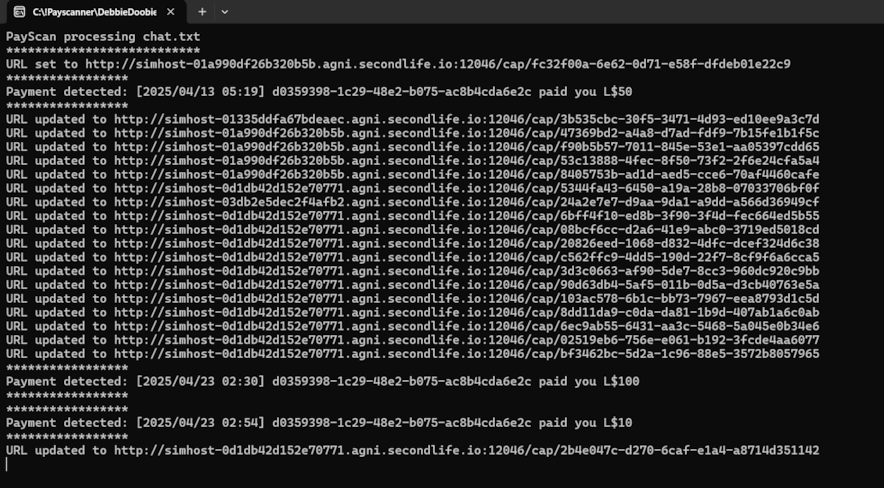
The program monitors any incoming payments, as well as changes of sim location within Second Life. Note that it frequently reports "URL updated" even though your avatar has been standing in the same spot! This reflects an internal change in Second Life's network rather than an inworld change of location. The program keeps track of this purely to be able to locate the SVL script in world when required to do so.
To use Payscanner you don't need to do anything more than leave it running in the background. As well as Firestorm it has also been tested with Radegast and is similarly able to detect payments and pass them on to SVL.
Congratulations for reading this far. Having followed all these steps you are now ready to embark on your new career as a teleporting, house to house AFK whore. Good luck and may the force be with you!