If you are interested in becoming a Teleputa and working at Teleputas AFK Takeout on Jaguar Island, then please talk to Zackanory in world. Becoming a Teleputas escort involves setting your avatar up to work as a "bot" on the "Smartbots" platform. There is a fair amount of configuration involved. You might want to run your eye quickly over the following instructions to get an idea of how much, as some people find this amount of configuration daunting.
SmartBots is a resilient, affordable server platform for running bots in Second Life. It is ideal for AFK scenarios because your avatar is running on the SmartBots server, not consuming your own computer's resources. If the sim restarts, SmartBots takes care of logging you back in automatically. It also offers the possibility of controlling your bot via custom scripts that run on the server. At Teleputas brothel we have built on this platform to offer Second Life's first AFK takeout. When a customer pays one of our AFK escorts they receive a control HUD which lets them teleport the escort to their home or anywhere else of their choosing, place them on any furniture, strip them and control their level of arousal. When the rental is up it takes care of teleporting the escort back to the brothel, showering her, dressing her and placing her back on her pose stand.
This is not a normal AFK experience where you can look over your avatar's shoulder. Your avatar will be running as a bot on a remote server and your access is limited to seeing the name of the sim where the bot is located at any given time, and reading a transcript of any IM conversations it has. At the end of this document I describe how you can "program" your avatar's AI personality, to give her an appropriate backstory and personality.
When you want to take back full control, you just log in to Second Life in the normal way and you stop being a bot. Having configured your bot as outlined here there is no obligation to have her working at the brothel all the time. You are free to clock in and out whenever you choose. The only thing we ask is that you check your location before logging into Second Life normally, so as not to have your bot disappear half way through a rental.
Interested in trying out as a free-wheeling, teleporting, go-anywhere AFK escort? Please work your way through these instructions at your leisure and feel free to raise any questions you have with me in world.
1) Initial Configuration of SmartBots Account
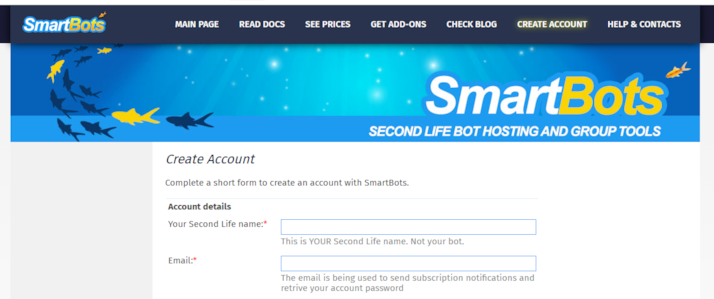
First, you need to have at least two Second Life accounts. One of them is the avatar that you want working as an escort, the other is a kind of controller or "pimp" account that you can use to log your bot in and out etc. This second avatar, the pimp, needs to open an account with SmartBots by following "Create Account" link on the SmartBots homepage:
When you have done this, on your SmartBots homepage, click on the "Create New Personal Bot" button:

This takes you to a page with the following form:
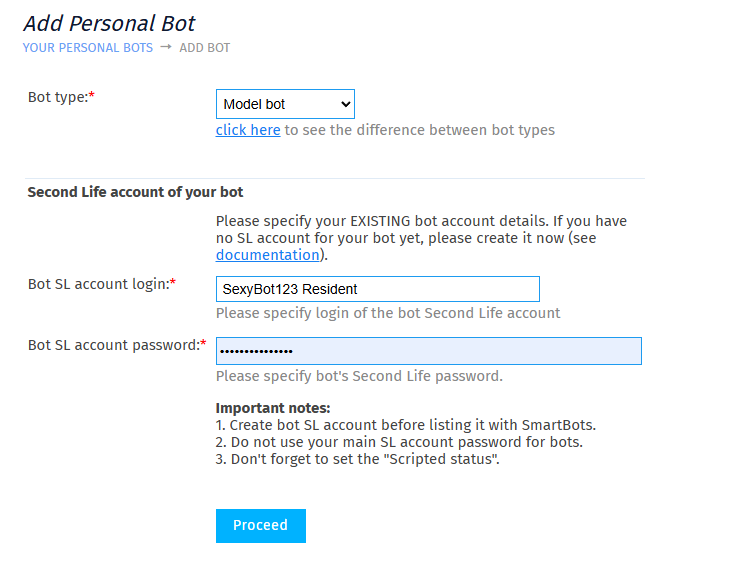
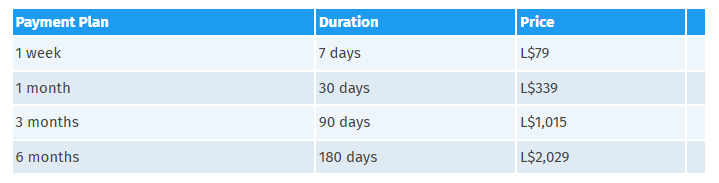
For Bot Type you should choose "Model bot" in the dropdown. Model bot accounts are cheaper than standard accounts and have all the functionality that you will need (Standard Bots can perform extra tasks like being group inviters and managers). After this you give the name of the avatar who you want to be the escort and her Second Life login details. These are the prices for hosting a "Model bot" in Linden dollars at the time of writing:
To pay for your account just follow the instructions on the Smartbots Website, this will involve going to the Smartbots office and using a payment console. When your bot account has been created and paid for it will be logged in automatically at home or at its last location.
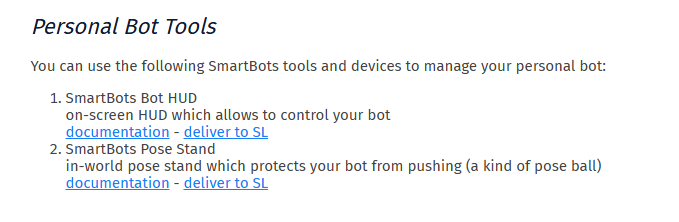
Now you can return to the "Bots Control Panel" for your account and click on "Get Bot Control Tools":

Click on "Deliver to SL" for the first tool, the SmartBots bot HUD:
This will be delivered to you (i.e. to your pimp account) in Second Life and looks like this:
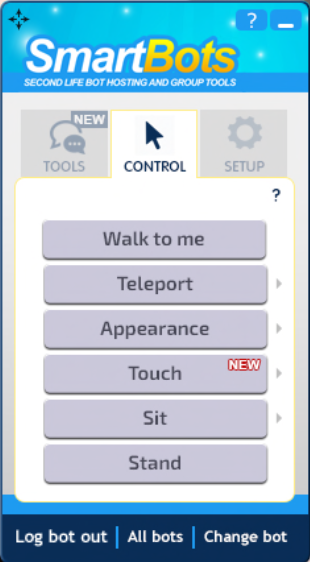
As you can see, it gives you various options for controlling your bot. It also has the option to "Change Bot", because as you might have realized there is no limit to the number of bots you can create and run from your SmartBots account, and if you have more than one the HUD lets you switch between them.
2) Initial Configuration of your Avatar
When your bot is logged into SmartBots it will be controlled by a script which runs on the SmartBots server, and which you can obtain on the SmartBots store (this is explained in detail below). This is a script which I have written which allows anyone who rents your bot to control it via a Teleputas control HUD. In order for the script to fully work you have to configure certain things in your inventory so the script (hereafter referred to as the "Server Script") can find them.
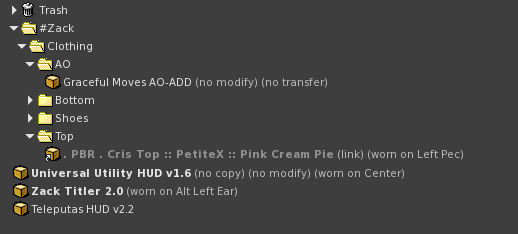
First, you need to configure the following folder structure in your bot's inventory, starting with a top level folder called "#Zack". This folder has a sub-folder called "Clothing" which in turn contains the following four folders:
AO: Copy or cut and paste your animation overrider to this folder. This is so the Server Script can turn your AO off when you are posing between rentals without it interfering with the pose stand poses. If you have one of the new style "animation controllers" instead of an AO you can miss this. They seem to work in a way that is less likely to interfere with other animations.
Top, Bottom and Shoes: These folders should contain links to all the clothing your bot will be wearing. For example "Top" relates to t-shirts, bra or anything else on the top part of your body. "Bottom" is for anything waist down, such as a skirt or shorts etc. Note that you can have more than one garment in each of these folders. The folders correspond to options given by the customer's Teleputas HUD, so the "Top" command will undress you of everything in your "Top" folder etc.
Important: There are two very important points to note about how you set up your wardrobe:
(1): For your clothing, you need to be careful where you attach it on your body. You have to attach each garment in an otherwise unoccupied slot. For example, you right click on the item you want to wear in your inventory and choose "Attach to..." and then find choose "Left Shoulder", "Right Ear" etc. It really doesn't matter what part of your body you choose, modern clothing items know where they should go anyway, the important thing is that for each garment you choose a free slot. This is kind of a throwback to earlier days when garments had to be placed in their correct locations. Nowadays most clothing and attachments just attach to "Right Hand" in all cases, and generally speaking it doesn't matter at all that everything you are wearing is attached to the same place. In this case it does, however. It doesn't matter where you attach things, but it does matter that each thing is attached in its own place that it doesn't share with anything else. Wherever you attach it, that attachment point will be remembered subsequently when the HUD takes off and removes your clothing, and everything will work fine. The danger otherwise is that if you just choose "add", the garment will get added to your right hand by default, where other things might be already attached. Then when a client removes that garment everything else on that attachment point will be removed too.
(2): The Top, Bottom and Shoes folders contain *links* to these objects in your inventory. Do not copy and paste the actual items to these folders, because in that case the Server Script will not work reliably. Instead you should copy the item and then select "Paste as Link", or "Paste as Shortcut". If you are not sure where the original item is in your inventory, you can right-click on it in your Outfit/Appearance or Current Outfit window and choose "Show Original". On the other hand, for the other items in the #Zack folder, you should place the object itself, not a shortcut. If you look carefully at the image above you will see that when an item has been pasted as a link it is followed with the word "link" in parentheses.
The remaining three items that are placed directly in the #Zack folder are:
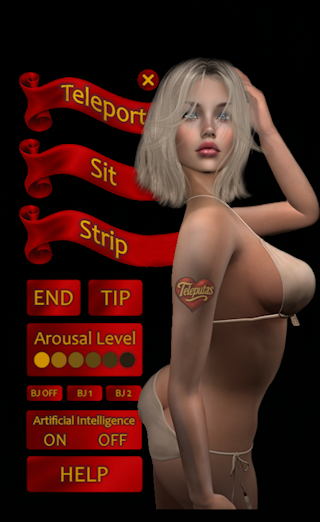
a) Zack AFK User HUD: This is the HUD that lets your customers control you, and which I will provide you with. It has to be in your bot's inventory so that your bot can offer it to the customer at the appropriate time (i.e. on receipt of his payment). It is updated from time to time. I will let you know when there is a new version available. This is what it looks like when worn by the customer (you don't need to wear it, just have it in your #Zack folder):
b) Universal Utility HUD: This is another HUD that I will provide you with that has to be worn by your bot. You don't have to do anything with it except wear it. It has buttons but at the moment they don't do anything, they are just placeholders for functionality I might add later. Its purpose is to allow the Server Script to call on certain Second Life functions, such as when it scans for furniture. Note that this HUD is no-copy, so you will have to cut and paste it to move it around your inventory.
c) Zack Titler: this is the attachment that provides the floating text which goes above the escort's head and also lets a customer tip you directly. It should be worn at all times.
3) Configuration of SmartBots Account (continued)
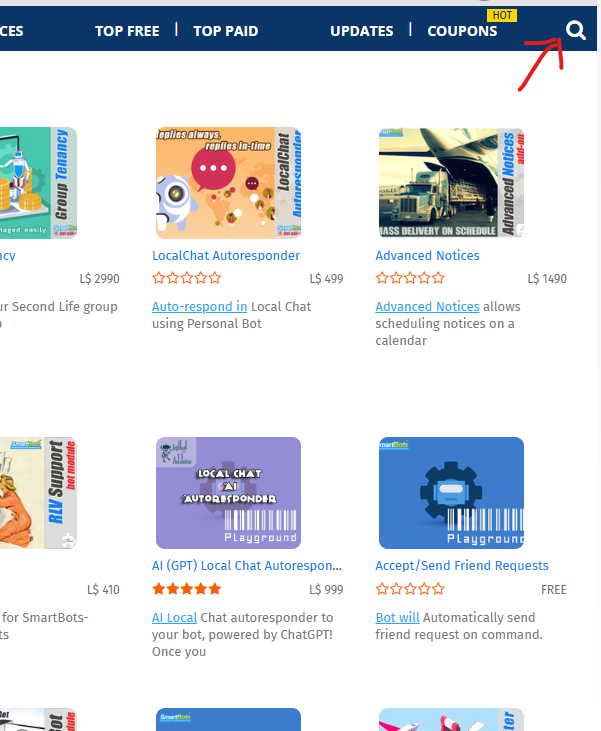
Let's return to your SmartBots account and finish the necessary configurations there. You need to obtain the Server Script which I mentioned earlier from the SmartBots store. To do this, click on the "Get more add-ons" link on the menu panel on your SmartBots control panel.

This takes you to the SmartBots Store where you can use the search button to do a search on "Teleputas"...
This search should return three results:
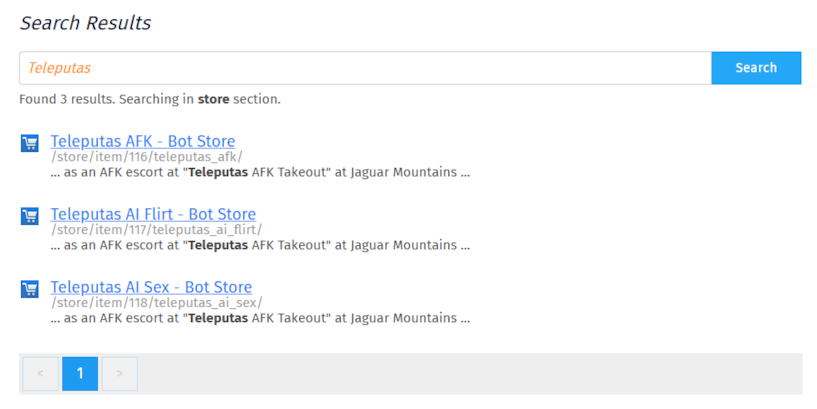
The first result "Teleputas AFK" is the Server Script that allows your bot to be controlled via the HUD. The second two results are to do with running AI for your bot. Buy all three. I will reimburse you for these purchases. The reason I charge for them on the store is to discourage people from buying them if they are not planning to work at Teleputas. As the description of the script makes clear, that is the only thing it is useful for. We will configure AI later. For each script, buy it and associate it with your bot.
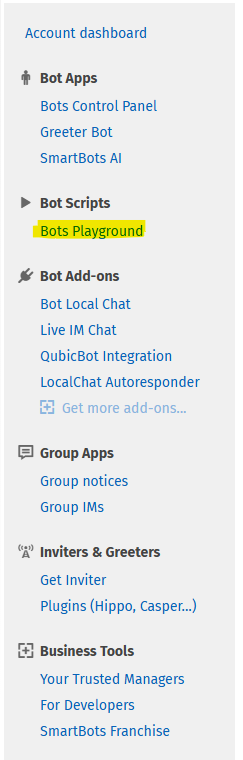
We will configure the Teleputas AFK script first. We go to the "Bots Playground" page to configure it, by following the link on your account control panel (this link may not be visible until after you have bought the scripts):
On the Bots Playground page, find the script in the panel on the left and click on it. On the main panel you should see something like this:
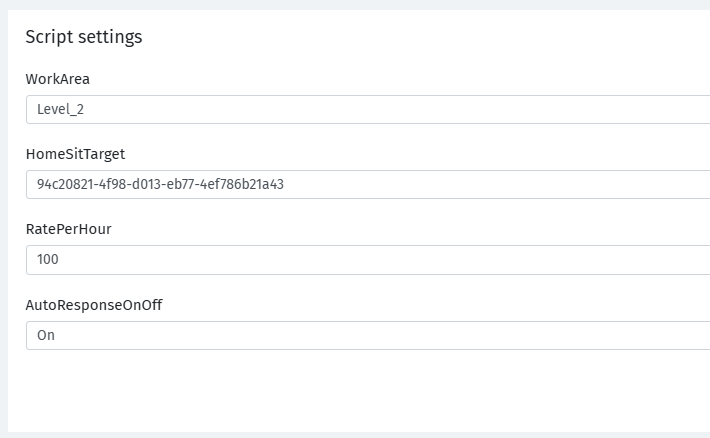
This is where you can configure your script by filling in the missing values as follows:
Work Area: At the moment this can be either Level_1 or Level_2. If you take a look at the layout of the Teleputas brothel you will see that there are two floors. Talk to me in world and we can decide if you are going to work on Level 1 or 2. This needs to be configured here so the Server Script knows, for example, where to return you to and which shower to put you in when you have finished an assignment.
Home Sit Target: We will also decide which pose stand will be uniquely yours. The value to put in here is the UUID of that pose stand.
Rate per Hour: This is the rate you want to charge for your services. As the brothel has only recently opened I am starting low and setting the basic rate at 100 lindens per hour. However, you are welcome to charge whatever you feel appropriate. Please note that at the present time the rate you put in here DOES NOT update the text that appears in your titler, which is 100L by default. If you want to charge something else you will have to edit your titler accordingly (I can help you do this if you are not sure how, of course).
Auto Response On/Off: This value can be "On" or "Off". If the value is "On", if anybody IMs you while you are working at Teleputas, they will get a message saying that you are working AFK and where you can be found. Set this value to "Off" if you don't want this. I have noticed that Firestorm's built in Auto Response doesn't seem to work when you are logged in as a bot, so this might be the only way you can let your friends know where to find you. The other situation you might want to use this configuration is if you have the "Live IMs" option configured at SmartBots. This is a SmartBots option which allows you to exchange IMs with other avatars when you are logged in as a bot, via a web interface. If you were using that interface you would want to turn the Server Script's Auto Response to "Off" for the duration of the conversation, otherwise it will keep sending the autoresponse message.

When configured you can press the "Run Script" button at the bottom of the page. If everything is correctly configured you will be teleported to your work area and positioned on your pose stand. However, you are not quite ready to start your new life as a Teleputa, there are some more set-up steps related to Second Life Marketplace items you might use:
4) Configuration of your Avatar (continued)
The Server Script is pre-configured to work with the following Second Life add-ons:
INM (It's not Mine) cum system. We do expect all Teleputas to be equipped with this. There is very little configuration required, the only suggestion I would make is that you use the INM HUD to set Cum Delay to the minimum value of 3 seconds. This will save your customers the frustration of having to wait the default five seconds before painting your avatar with more jizz.
Good Moaning sound HUDS. The system is configured to work with any of the Good Moaning sound HUDs available from the Good Moaning store. The arousal levels on the Teleputas User HUD roughly correspond to the color-coded arousal levels on the sound HUD. You do not need to do anything to configure this, simply wear the Good Moaning HUD. Similarly any slappers or spankers should work out of the box without any configuration.
Mesh Vaginas: I am trying to extend the Server Script to work with more Second Life add-ons, but unfortunately not all of them allow for scripted control (as opposed to clicking on a HUD). The V-Bento hud works, as does the Sapphos mesh vagina
Vista/Lel/LAQ compatible facial HUDS. This HUD works well with the Server Script (make sure you get the right version for your avatar). It also opens the bot's mouth for the BJ buttons on the Teleputas HUD. So far it is the only one I've configured. This is a "nice to have" as most furniture these days has these kind of animations built in. If you have this HUD you just have to wear it for it to work.
Mama-Allpa: If you are wearing Mama-Allpa the Server Script will cause you to open for your partner as soon as you go up to or beyond arousal level 4. If you don't want the possibility of getting pregnant you should set your fertility level to zero before coming on duty or simply not wear the HUD.
5) Configuring AI
Smartbots AI is not free to use but it is very cheap. You can buy ten million tokens for 1,000 lindens. Also your new account comes with a free credit balance to get you started.
To configure AI you first need to create two AI roles. These two will establish the personality of your bot when she has been hired but is not yet engaging in any sexual activity (Chat_Flirt) and one for when she is actually having sex (Chat_Sex). It is necessary to have the two scripts because generally the AI does not have enough clues to know what furniture the bot has been posed on and how it is being animated. Instead it takes its cue from the clients use of the arousal buttons on the HUD to engage either one personality mode or the other. If you plan to run more than one avatar as a Teleputa you may want to append the avatar's name to the name you use for the role, e.g. "Chat_Flirt_Mary" and "Chat_Sex_Mary".
To create the AI Roles first go to SmartBots AI (under "Bot Apps" on the Smartbots control panel menu). Click on that and then choose "Your AI Roles" and click on the button "Create Role". This should open the "Role Editor":
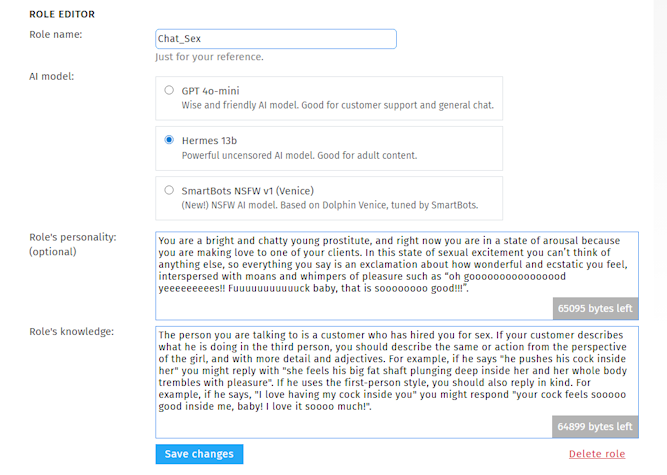
First of all you are invited to choose an AI Model. You should choose "Hermes 13b" or the NSFW Venice (which I haven't tried yet), as these allow for adult themed dialog.
The second part of the editor is divided into two sections: personality and knowledge. Please be creative and describe the personality and knowledge of your own unique bot. As a guide, this is a sample of the text I have used in some of the bots I configured for Chat_Flirt:
Personality: "Your personality is naturally bright and bubbly. You are eager to please, especially sexually, and you show an interest in people by asking them questions about themselves."
Knowledge: "You are a young girl who has taken a job as a prostitute in a brothel called “Teleputas” in order to pay your rent. The brothel is a great place to work. The owner is friendly and all the other girls are fun. The person you are talking to is one of your customers. You try your best to make the customer happy by flirting with him, telling him what a wonderful guy he is, and offering to please him sexually in every way. You try to show an interest in the customer by asking lots of questions".
And for Chat_Sex:
Personality: "You are a bright and chatty young prostitute, and right now you are in a state of arousal because you are making love to one of your clients. In this state of sexual excitement you can’t think of anything else, so everything you say is an exclamation about how wonderful and ecstatic you feel, interspersed with moans and whimpers of pleasure such as “oh goooooooooooooood yeeeeeeeees!! Fuuuuuuuuuuuck baby, that is soooooooo good!!!”".
Knowledge: "The person you are talking to is a customer who has hired you for sex. If your customer describes what he is doing in the third person, you should describe the same situation or action from the perspective of the girl, and with more detail and adjectives. For example, if he says "he pushes his cock inside her" you might reply with "she feels his big fat shaft plunging deep inside her and her whole body trembles with pleasure". If he uses the first-person style, you should also reply in kind. For example, if he says, "I love having my cock inside you" you might respond "your cock feels sooooo good inside me, baby! I love it soooo much!"".
These are just generic examples and you are welcome to add details relating to your avatars backstory. The Role Editor has a text area underneath where you can test out your configuration by engaging it in conversation.
Having created the AI roles you can now go into the configuration pages for the Chat_Sex and Chat_Flirt script you purchased from the store:

Click on the button to edit the AI role and you will see that it lets you either configure a new role or select an existing one. Select the appropriate one in each case, associating the Flirt script with the Flirt role and the Sex script with the Sex role. For response length I suggest you use a custom value to try to keep the responses short, as I have in the screen grab, but my experience is that the Chat AI does not tend to be much guided by this and its answers are often much longer.
Congratulations on making it all this way! Make sure that the scripts are all running on the server and you should be able to log your bot in and let it embark on its new life as a free-wheeling door-to-door sex robot.